Custom Pipelines
Table of contents
General
Getting started
Workflow requirements
Annotating metagenome sequences
Creating hierarchical attributes
General
All offered analysis tools provided by the MGX platform are implemented as workflows for the Conveyor Linke et al.,2011 workflow engine developed by B. Linke. Within Conveyor, tools are provided as so-called nodes, which resemble individual processing steps and implement novel analysis methods by simply arranging and connecting them into a larger workflow.
Conveyor currently includes plugins providing typical bioinformatics tools like BLAST or HMMer but has recently been extended with dedicated plugins aimed at metagenome analysis, like MetaCV, MetaPhyler, or MetaPhlAn, which all perform taxonomic analysis. A dedicated Conveyor plugin provides access to MGX data structures, thereby enabling the analysis of metagenomes stored in the MGX system with processing tools offered by Conveyor itself.
While workflow definitions are stored in an XML-based format, a graphical user interface, the Conveyor Designer, enables users to implement new analyses by simply placing and connecting nodes.
The Conveyor Designer application allows easy and user-friendly development of custom analysis algorithms in a graphical way.
As Conveyor is actively developed and new tools are continously integrated, giving a thorough introduction to Conveyor is beyond the scope of this document. The most up-to-date documentation describing Conveyor itself and the Conveyor Designer in particular can be found at the Conveyor web site:
http://www.uni-giessen.de/fbz/fb08/Inst/bioinformatik/software/Conveyor
Getting started
In order to implement a custom workflow, the Conveyor Designer needs to be configured with a definition of available Conveyor plugins and node types. This is easily achieved by importing a plugin dump file, which contains a list of data types and nodes provided by a Conveyor installation.
To use the Designer to implement a workflow for the MGX framework, a corresponding plugin dump file can be obtained from within MGX by right-clicking on the project name.
A plugin dump file for use with the Conveyor Designer can be obtained from within MGX by right-clicking on the project name.
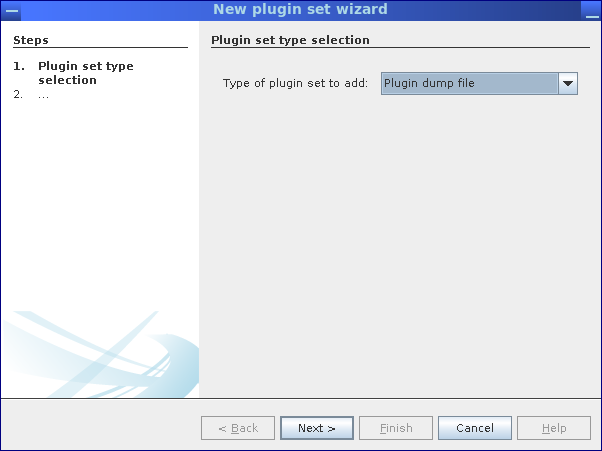
Afterward, start the Designer application and define a new provider (Right-click on Available providers). Make sure to specify Plugin dump file as the type of plugin set and select the file generated by MGX. Once the plugin dump file has been imported, you can implement new workflows.
Starting with an empty sheet, nodes can be dragged from the list of all available nodes on the left and placed onto the sheet. Node connections are created by clicking on a node, keeping the mouse button pressed, and releasing it over the connection target node, thus linking; in ambiguous cases, e.g., for nodes with several unconnected inputs/outputs, a dialog will allow to select the desired connection. Nodes may also require node-specific configuration, which can be edited from a nodes context menu. A red border around a node indicates missing configuration items or connections.
Importing a plugin dump file into the Conveyor Designer.
Workflow requirements
To design custom Conveyor workflows for later usage within the MGX platform, several constraints must be met, which will be described in more detail.
First of all, a dedicated GetMGXJob node must be present within the workflow; in addition, this node has to be named mgx. During the execution of a pipeline within MGX, this node is configured via an external configuration file, providing required information about the context of a job, , e.g., access to a project database and associated storage.
The GetMGXJob node provides the necessary context for executing a workflow within MGX, such as database access. By convention, this node has to be named mgx.
Access to metagenome DNA sequences is provided via the ReadCSF node, which will provide all metagenome sequences for a sequencing run object within MGX, except those for which the “discard” flag has already been set. As pipelines are always executed for one single analysis job, this node needs to be connected to the GetMGXJob node.
The ReadCSF node obtains metagenome sequence data from within MGX; it has one input and needs to be connected to the GetMGXJob node.
Figure (below) shows a minimal example of a Conveyor-based pipeline for use within the MGX framework. Once executed, the pipeline would set the discard flag for all sequences.
A minimal working example of a pipeline developed for MGX, which would set the discard flag for all sequences.
Annotating metagenome sequences
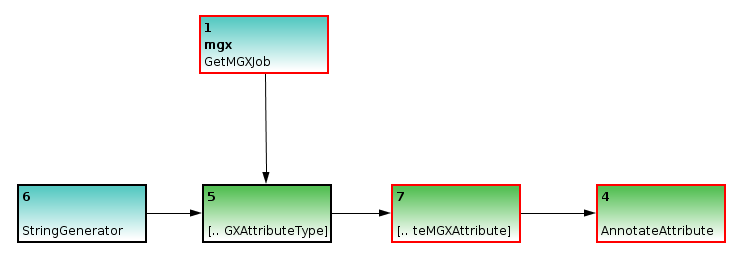
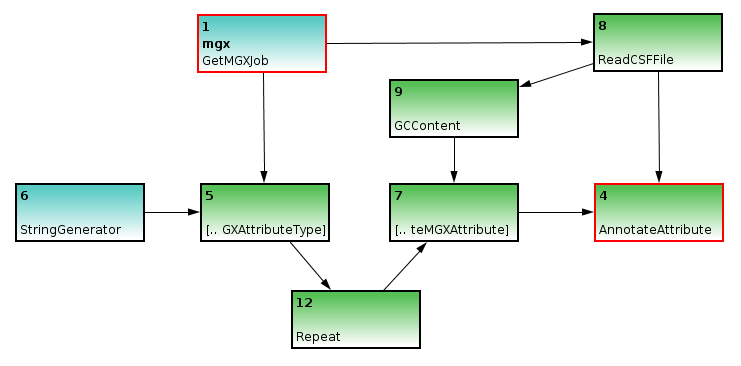
Basic template to illustrate sequence annotation. A StringGenerator is used to generate a label for the attribute type CreateMGXAttributeType, which also requires job context information. The attribute type is required to create attributes, thus the node is connected to the CreateMGXAttribute node. Finally, the annotation can be saved to the project database AnnotateAttribute node
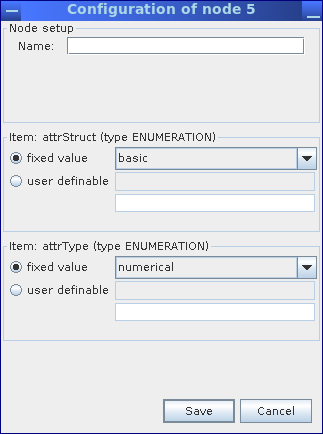
Annotation of metagenome sequences requires an attribute type and an attribute. As an example, we will illustrate the implementation of a pipeline for the analysis of GC content within metagenome sequences. We use a StringGenerator node configured to generate the string GC to create a label for the attribute type. As GC content is indicated by a number, we appropriately configure the CreateMGXAttributeType node to emit a basic (i.e. not hierarchical) as well as numerical attribute type.
Within the configuration dialog for the CreateMGXAttributeType node, structure and type of the generated attribute values are defined.
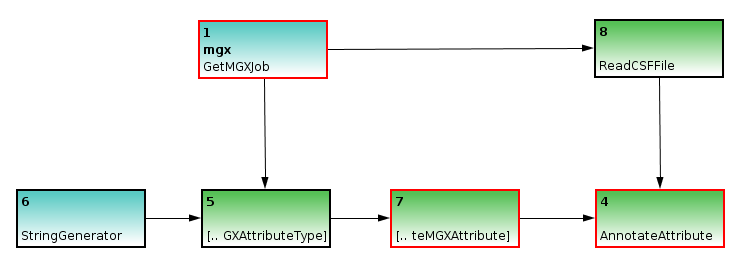
Incomplete example; the ReadCSF node will provide the necessary metagenome sequences to be annotated. Still, there is no actual analysis specified.
In a second step, we use the ReadCSF node to obtain access to the individual metagenome sequences; as MGX annotates sequences individually, a connection between ReadCSF and AnnotateAttribute is required. Subsequently, we implement the actual analysis, which is provided by the GCContent node. It will process all sequences and emit the corresponding GC content for each of them. To convert these values to appropriate attributes, an attribute type is required for each value; therefore, a Repeat node is inserted between nodes 5 and 7.
The GCContent node represents the actual analysis step; it is used to determine the GC content of a DNA sequence, which will then be converted into an attribute. Since an attribute type is required for each attribute, a Repeat node is inserted between nodes 5 and 7.
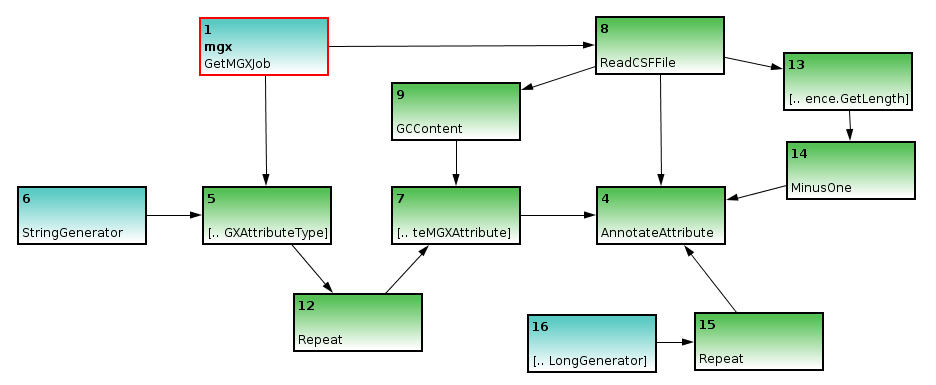
Finally, as an annotation always refers to only a part of a sequence, we will need to generate the corresponding start and end coordinates; since GC content refers to the full sequence, we can use an ULongGenerator node configured to emit 0 (MGX uses 0-based coordinates) to generate the start coordinate; this node needs to be connected to a Repeat node to generate a series of 0s.
The end coordinate can be created based on the sequences’ length, with 1 subtracted, obtained through the GetLength and MinusOne nodes.
The GetMGXJob node will retain its red border due to missing configuration; this, however, can be ignored, as appropriate configuration will be provided by the MGX framework automatically.
- Completing the workflow:
- The
ULongGeneratorandGetLengthnodes are added to specify coordinates for the subregion of the DNA sequence described by the attribute; the start coordinate is simply repeated, while 1 is subtracted from the sequences length due to 0-based coordinates.
Creating hierarchical attributes
Annotation of hierarchical attributes requires a little more effort. The CreateHierarchicalMGXAttribute node is used to obtain the inner structure of the hierarchy in a bottom-up approach. It contains several loops which will be explained in more detail.
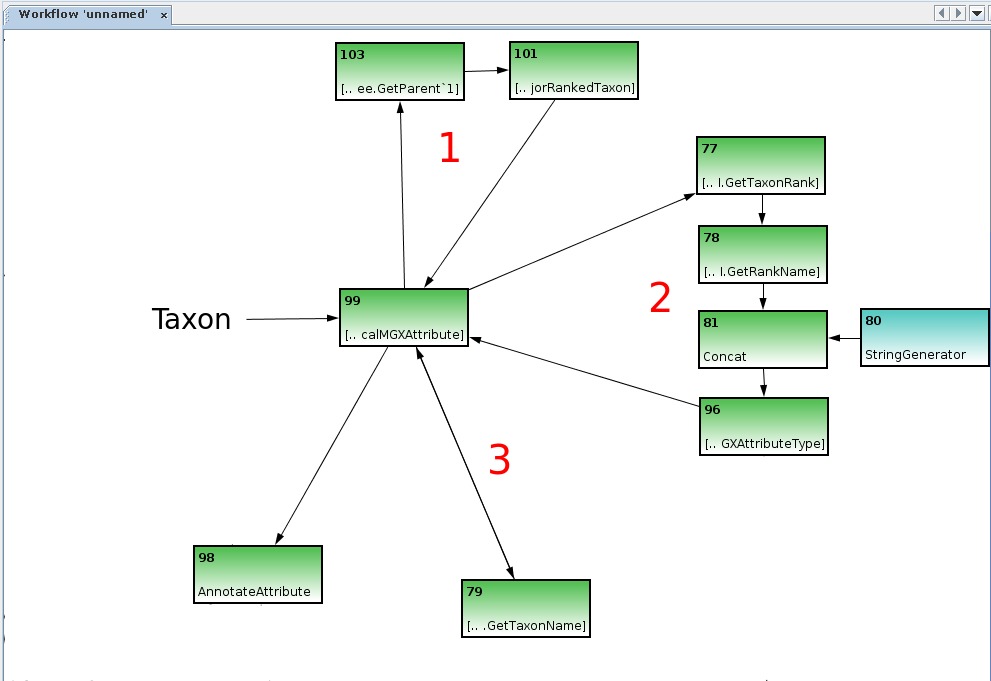
The CreateHierarchicalMGXAttribute node requires three loops (note double-ended arrow on third loop between nodes 99 and 79) to create the internal structure of the hierarchy. Several connections were removed from the figure for illustrative purposes.
A single object, e.g. a NCBI taxon generated by the Kraken Wood and Salzberg, 2014 classifier, is provided as an input into the node. The first loop is required to obtain the objects parent object, thus defining the hierarchy. In this example it is implemented using the GetParent and GetMajorRankedTaxon nodes, thus making sure only the major taxonomic ranks (superkingdom, phylum, class, …) are included.
The second loop is used to obtain the corresponding attribute type for an object: it operates on the initial taxon as well as its parents obtained by the first loop. GetTaxonRank and GetRankName nodes provide the corresponding ranks’ name, e.g. class.
The StringGenerator and Concat nodes are then used to create the attribute type NCBI_class. This value is used to create the corresponding attribute type employing the CreateMGXAttributeType node, which is returned into the CreateHierarchicalMGXAttribute node.
The third and final loop is used to map a data object to its name, which is used to create the attributes value; it is built up using the GetTaxonName node, which delivers its output back into the node.
Thus, the three loops might be termed as Get parent, Get AttributeType for object and Generate value.
The CreateHierarchicalMGXAttribute node emits a hierarchical MGXAttribute for the initial data object, with the corresponding AttributeType provided by loop 2 and the MGXAttribute’s value obtained using loop 3. Internally, loop 1 is used repetitively until the root node is reached, with all intermediary results passing through loops 2 and 3, thus generating a single path of hierarchical attributes within the taxonomic tree. The output of the CreateHierarchicalMGXAttribute is connected to the AnnotateAttribute node as in the previous example.
For brevity’s sake, several connections are hidden within the image, which have already been explained in the previous section; the CreateMGXAttributeType node needs an incoming connection providing a MGXJob, and the AnnotateAttribute node requires additional connections providing the sequence to be annotated and start/stop coordinates for the subregion which is described by the annotation.


